Category Archives: Mobile news gathering

Tout video

Photo Sep 07, 5 22 24 PMTout is the offspring of Twitter and a video camera, giving you 15-seconds of video to work with. While it’s not for every situation, when you want to add some quick context to a story without spending a lot of time, it’s a great tool. Here’s how to use it.

Find Tout in the App store or Google Play (app may appear differently than screenshots for Android users.)

Log into your Tout account if you have one. If not, log in using Twitter and you will have a Tout user that matches your Twitter account.

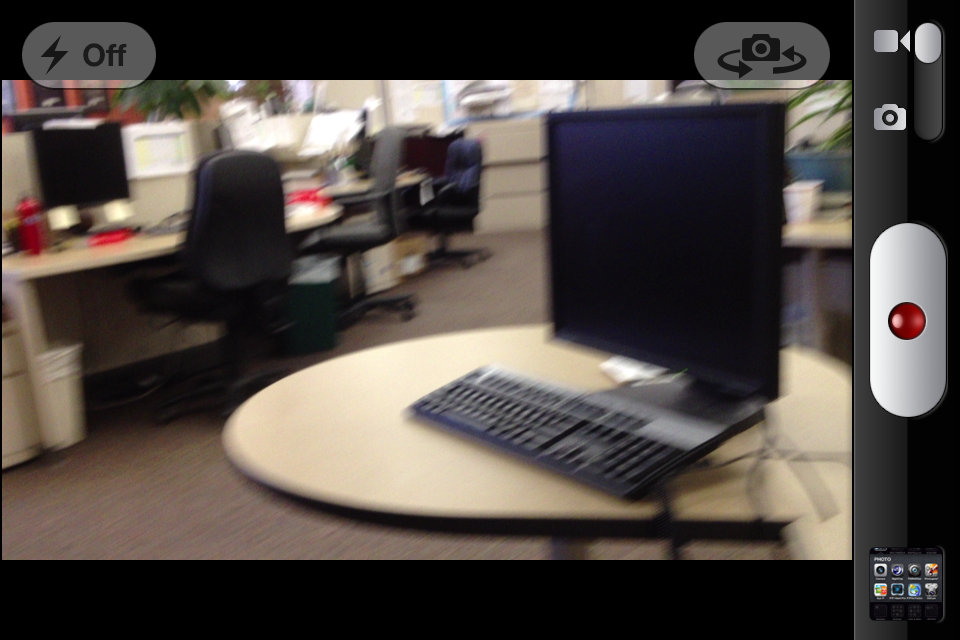
Once logged in, you will have a camera icon at the bottom center of the screen. Pressing it will display the shooting screen, which you can use vertically or horizontally depending on your preference. You can either take one 15-second-long clip, or pause and record to string several different angles together.


toutscreen2toutscreen1


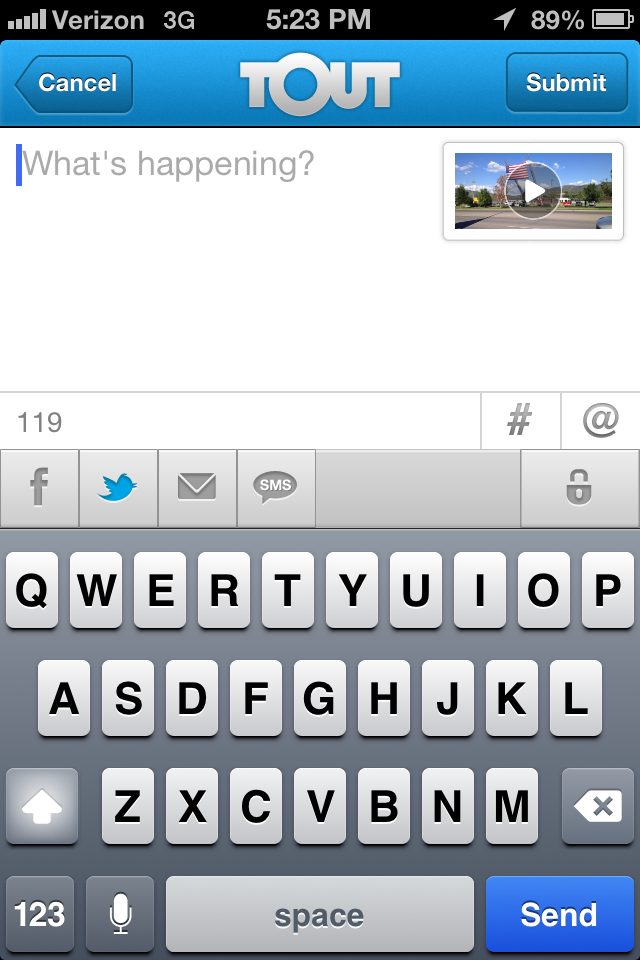
After you’ve shot your clip/s, it’s good to give the video a description so readers have more context about the video they are about to watch.


Photo Sep 07, 5 23 45 PM


If you have a new account, let the online editor know what your Tout user name is so they can follow you on the appropriate tout widget. This will allow you’re videos to display on the website as soon as you submit them. With this in mind however, it is important to only submit videos that are appropriate for all website visitors. Try to keep an ear out for people in the background that may be using profanity and be mindful of everything in the video.

Note: In the vertical shooting display, you can tap this iconicon  to upload a previously shot video clip as long as it is shorter than 15 seconds.


Sending photos and video clips to the office with Dropbox.

  • Create an account at Dropbox.com
  • Give the e-mail used to the newsroom Dropbox admin and ask them to invite you to the shared folders.
  • Download the Dropbox app and log in.
  • After accepting the invites you should see the shared folders. Tap the appropriate one.
  • Tap the plus sign in the upper right corner and select ‘Upload Here.’
  • Select all the photos or video clips that need uploading and tap ‘Upload.’
  • Photo Jun 18, 3 05 21 PMPhoto Jun 18, 3 05 29 PMPhoto Jun 18, 2 05 50 PM

Photo Jun 18, 2 06 05 PM


Getting Twitter notifications on your phone from fire/emergency agencies

Using this method, you don’t have to be on Twitter to see a breaking news tweet.

  1. Download the Twitter app on your phone. This has to be the Twitter app, not Hootsuite or Tweetdeck.
  2. Open app, sign in and search for the Twitter accounts listed below.
  3. If you are not already following them, click ‘follow’ and then click the person icon to the left of the ‘follow’ button
  4. Click ‘Turn on notifications’ (You may have to go into your phone settings and allow Twitter to send you notifications before it will let you do this.)

@DurangoFire – DFRA

@BLMColoradoFire

@BLMColorado

@LPC_OEM – La Plata County Office of Emergency Management

@SanJuanNF – Ann Bond’s account

@CSP_News – Colorado State Patrol’s public affairs account

@ColoradoDOT – CDOT

@swcoredcross – SW Colorado Red Cross

@CityofDurango

@inciweb – this one is hit or miss because it posts fires from across the country

Posting photos directly to Saxotech from your phone

It is possible in spot news situations to eliminate the middle man so to speak (and need for a computer) and send photos from your phone to the editorial system with an ftp client. Photogs will also have ways to send high res images from their cameras to their phones but that is another tutorial.

USING FTP CLIENT PRO (more stable than many other clients)

  • Get FTP Client Pro from the App Store
  • Login with your ftp credentials
  • Go to the appropriate folder, Photos_linktorequest if you have the assignment id, or even assets if you have a pdf or doc on your phone for an asset. In this example we’ll use the day drop assuming it is a photograph and you don’t have a photo request number.
  • Tap the + icon in the lower right and navigate to your photo. Tap Upload.
  • When prompted for a File Name, tap Rename and use the appropriate naming convention. Tap ok.

Photo Nov 05, 12 15 40 PMPhoto Nov 05, 12 14 07 PMPhoto Nov 05, 12 13 54 PM   Photo Nov 05, 12 19 07 PMPhoto Nov 05, 12 18 22 PMPhoto Nov 05, 12 17 14 PM


Sending gps coordinates for use online

Photo Jun 04, 2 12 08 PMPhoto Jun 04, 2 12 48 PMIf you are using an iphone, go to the app store and search “gps location.” The first listing should be an app by the same name as pictured here. Purchase the app for 99 cents at the time of this writing.

Once open, you can tap the icon in the lower left to find your location.


By tapping the icon in the lower right (a box with an arrow coming out of it) you can share via text, email or other options. For our purposes, you will likely share via e-mail to editors working on the story or online presentation of it.

Photo Jun 04, 2 12 50 PMPhoto Jun 04, 2 14 17 PM

Editing iPhone video in iMovie

This is a step by step guide to editing video on the iphone, but there is no substitute for simply experimenting. Click on the images below for larger display.

Photo Feb 26, 9 39 40 AM

You will need at least one photo or video clip to begin, so launch the camera. If shooting video, make sure the slider in the upper right is on the video icon and double-tap the screen to shoot in wide-screen. (see right)

Shoot your clip or clips at a minimum of 5 seconds, trying to keep the phone stable.

Next, launch iMovie and click on the + button. Then tap Create New Project.

Once you are here, you can tap the i button for information about the function of all the other buttons. (see below)

Photo Feb 26, 9 40 55 AM Photo Feb 26, 9 42 56 AM

The first step is to tap the Add Media button, which will allow you to select audio, video or photographs to insert. Start with a video or photograph. With that in place, it is a good time to do your interview with a source. Try to find a quiet place, and with the phone close to the subject, tap the record audio button. Once you start, iMovie will give you a 3-second countdown and begin recording.

You can double-tap elements to delete. Tapping once will provide yellow handles you can use to trim from the ends. (see image to the right) Tap and holding the element will allow you to move it in relation to other media.

If you want to use short clips from your interview, use the trimming handles to select the first clip. You can then tap Add media, tap audio and navigate to the recordings menu to drop the interview on the timeline again, using the trim handles to shorten it to the next piece of audio. The menu options are displayed below.

Once you have multiple visuals on the timeline, double-tapping the transitions will allow you to choose the transition type and duration.

Once you have multiple visuals on the timeline, double-tapping the transitions will allow you to choose the transition type and duration.

From this main Add Media screen, audio can be selected at the bottom right.

From this main Add Media screen, audio can be selected at the bottom right. In this shot, you can also see the ability to select a portion of a clip using the yellow trim handles before adding it to the timeline.

Once on the audio section, select Recordings and find your interview.


After you have your audio, video and photographs where you want them on the timeline, it’s time to export the movie. From the project, tap the Back to projects button in the upper left.

Now, tap the third icon from the right at the bottom of the screen. (A rectangle with an arrow coming out of it seen below.) Select Camera roll as the destination, (center) and choose large quality (right). Uploading video will be covered in a separate tutorial.

Photo Feb 26, 9 46 04 AMPhoto Feb 26, 9 46 14 AMPhoto Feb 26, 9 46 09 AM